Deployment and CI/CD
Deploying your Ruby static pro website is as easy as running the middleman build command and pushing the files to your server.
This guide covers the foollowing:
Building the Static Site
To build yours static site, perform the following:
- Run
bundle exec middleman build - Files are built into the
./buildfolder - Distribute these files to any host that can serve static files, such as any VPS, Hatchbox, Amazon AWS S3, and more.
Cleaning Your Build
If you need to clean your build because something seems off, you can use the --build switch:
bundle exec middleman build --clean
Then take the files from the build folder and distribute them to any place where you can host static files. The middleman build command generates your site for you into the build folder.
GitHub CI/CD with GitHub Actions
CI/CD is already set up and supported if you’re using Hatchbox. However, if you’re not, no worries, you can easily adjust.
You can easily set up CI/CD with another procider such as S3, GitHub Pages, Vercel, etc.
The .github/workflows/middleman-build.yml file is completely customizable so you can alter it to suit your needs.
The only component of the middleman-build.yml file that is specific to Hatchbox is the last action: Deploy to Hatchbox. You can simply delete that and the associated HATCHBOX_DEPLOY_KEY key info.
GitHub CI/CD with Hatchbox
Ruby Static Pro ships with support for automated deployments via Hatchbox (Ruby Static Pro’s sites use Hatchbox) and the github-hatchbox-deploy-action. This is preconfigured for you in the .github/workflows/middleman-build.yml file, you just need to enable it in Hatchbox, and provide a key to your GitHub secrets.
There are a couple steps to get this working:
- Set up your app on Hatchbox
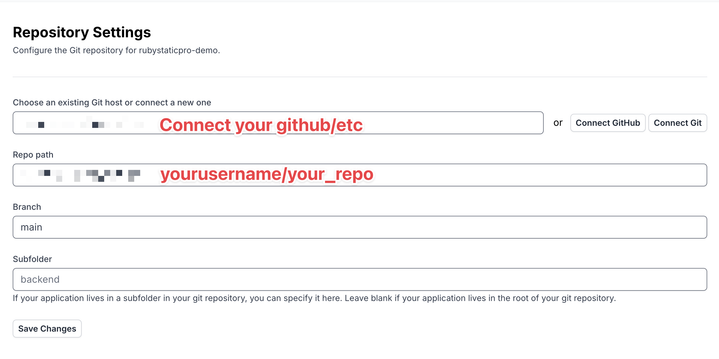
- Add your repository info as such (replace the blurred values with yours), such as
yourusername/your_repo
- Click the
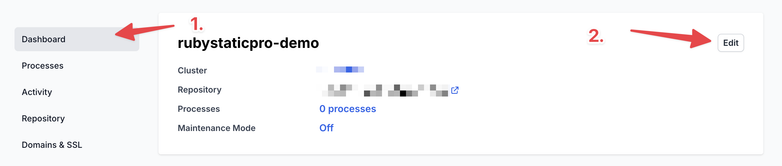
Dashboardmenu on the left and then clickEdit.
- In the
Post-build scriptsection add this code:
bundle install
npm install
bundle exec middleman build
cp -r build public
During a deploy, this code will run as soon as its done pulling in your code from Git. It will install all the necessary Ruby gems and JavaScript packages, then it will build your site and copy it to the public directory which is served by Hatchbox.
-
Then click
Update App. -
Now click
Deployagain. Your deployment should succeed. You can view the activity log in Hatchbox to verify.

Enabling Auto Deployment
You can do this in two ways.
- Hatchbox Automatic Deploys
- Github Action Deploy
Both work, but we recommend #2.
Why?
With #1, the code will be automatically deployed on each push to main, which might contain errors causing the deployment to fail.
With #2, the Github Action CI/CD pipeline will attempt to build the site, and if its successful, only then will it deploy it.
Which one you choose is up to you.
Hatchxbox Auto Deployment
To enable auto deployment on each push to the main branch:
- Go to the
Repositorymenu item - Scroll down and click
Enable automatic deploys
Every time you push to main, a deployment will be kicked off, regardless if middleman build works or not.
Github Action CI/CD Deployment with the Hatchbox Action
This option uses the Hatchbox Github Action. You can view the entire workflow file here.
The part of importance is at the end:
# Only deploy to hatchbox if the secret is set
- name: Deploy to Hatchbox
    if: env.HATCHBOX_DEPLOY_KEY != ''
    uses: hatchboxio/github-hatchbox-deploy-action@v2
    with:
        deploy_key: ${{ secrets.HATCHBOX_DEPLOY_KEY }}
This will deploy to Hatchbox ONLY after a sucessful build.
To enable this, you’ll need to get your Hatchbox Deploy Key and add it to Github.
- Log into Hatchbox and go to your app
- Click Repository
- Scroll down and find the Hatchbox Deploy Key and copy it:

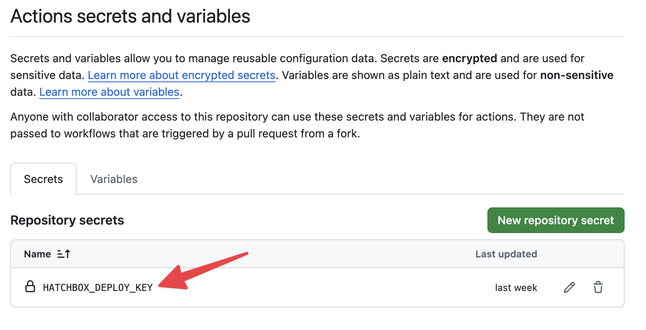
- No log into Github and go to your repo and click
Settings. - Find your
Secrets and Variablessection - Click
Actions - Click
New Repository Secret - Give it the name of
HATCHBOX_DEPLOY_KEYand the value of your copied hatchbox deploy key from above.
- Save the file.
- On your next push to main, the Github Action will start, and then it will automatically deploy to your server after a successful build.
What happens during this process ..
- Github Actions builds your app in a clean environment
- On sucess, it tells the Hatchbox Github Action “Ok, please deploy this”
- The Hatchbox Action then deploys the latest to your app on your server
- The files are transferrred up, and then the
Post-build scriptis executed (which installs and builds the site locally) - The built site is copied from
./buildtopublicwhich is the public folder to serve files for the site. - Your site is now live.