Creating Blog Posts in Ruby Static Pro
This guide will walk you through the process of creating new blog posts in Ruby Static Pro with Middleman. We’ll cover two methods: using the Middleman CLI and creating posts manually.
Using Middleman CLI
The easiest way to create a new blog post is by using the Middleman CLI:
bundle exec middleman article "Your Blog Post Title"
This command will generate a new file with the correct format and frontmatter.
The blog will be created from the new_article.tt template (source). The template is explained below.
Creating Posts Manually
If you prefer to create posts manually, follow these steps:
- Navigate to the
source/blogdirectory. - Create a new file with the naming convention:
YYYY-MM-DD-your-post-title.html.markdown- For example:
2024-09-24-my-new-post.html.markdown
- For example:
File Location and URL Structure
Based on our configuration:
- Blog post files are stored in the
source/blogdirectory. - The URL structure will be:
/blog/your-post-title- For example,
2024-09-24-my-post.html.markdownwill be accessible at/blog/my-post
- For example,
Writing Your Post
Posts are written in Markdown and will be rendered as HTML. The content will be formatted using Tailwind CSS typography prose classes for a clean, readable layout. Learn more about tailwind typography.
Frontmatter
Each post should begin with frontmatter. Here’s a detailed explanation of the frontmatter template:
---
# Title and summary are used for OGP meta tags
title: "Your Blog Post Title"
summary: "A brief summary of your post"
date: 2024-09-24 12:00 UTC
type: blog
tags: tag1,tag2,tag3
author: yourname # see data/authors.yml file
featured_image:
# Use the following to override the default OGP settings
# ogp:
#   title:
#   description:
#   image_path:
---
title: The main title of your blog post. This will be used for OGP (Open Graph Protocol) meta tags by default.summary: A brief description of your post. Also used for OGP meta tags by default.date: The publication date and time of your post. Use the format: YYYY-MM-DD HH:MM UTC.type: Should be set to “blog” for all blog posts.tags: A comma-separated list of tags relevant to your post.author: The name of the post’s author. This is the authors key in thedata/authors.ymlfile. Learn about author blocks here.featured_image: (Optional) Path to an image to be featured in the post.og_image: (Optional) Path to an image specifically for OGP. If not set, it may default to the featured_image.ogp: (Optional) You can override the default OGP settings by uncommenting this section and providing customtitleanddescription.
Content Structure
After the frontmatter, you can add a table of contents:
- TOC
{:toc}
The table of contents will look like this:
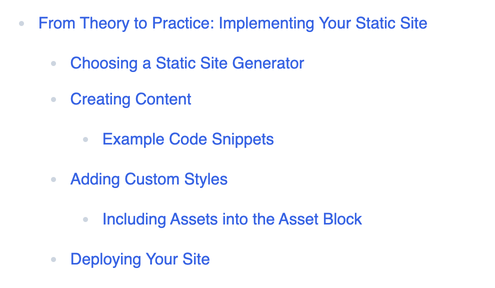
The table of contents is automatically generated for you based upon the various headings of your blog post.
Then, write your post content using Markdown syntax.
Adding Images to Your Blog Post
When you want to include images in your blog post, follow these steps:
- Create a folder with the same name as your blog post file (without the
.html.markdownextension) in thesource/blogdirectory.- For example, if your post is named
2024-09-24-my-post.html.markdown, create a folder named2024-09-24-my-post.
- For example, if your post is named
-
Place your images in this newly created folder.
-
Reference the images in your Markdown content using the following format:
Note that the path starts with
/blog/followed by the folder name and then the image file name. - After the site is built, the image will be available at
/blog/my-post/my_image.jpg.
This organization keeps your images tidy and ensures they’re properly referenced in both development and production environments.
Syntax Highlighting
See the syntax highlighting doc here.
Author Blocks
Author blocks are present at the bottom of the blog. View the author blocks docs here.
Additional Notes
- Our configuration uses GitHub Flavored Markdown (GFM) for enhanced formatting options.
- The
smartypantsoption is enabled, which provides typographically correct output. - Posts are paginated, with 9 posts per page.
- Tag pages are generated automatically and can be accessed at
/blog/tags/your-tag.
Remember to commit and push your changes to see your new post live on the site!